
Compressor vs DaVinci Resolve – Noise Reduction

So I was evaluating the most time-efficient workflows for noise reduction when working with 4K footage, in this example I used ‘straight up’ 4K ProRes 422 from a Blackmagic Production 4K camera.
Without wanting to drop extra money on plugins and external utilities, the choices are basically Compressor and DaVinci Resolve. Resolve’s NR is so good it’s hard to put into words. v14 updates changed the way it works ‘a tad’ in that when using Spatial NR, Chroma and Luma can no longer be adjusted separately when using the Faster setting but unless you’re flogging a dead horse you can live with this.
If you can distribute the rendering and get another machine to do the final export, lucky you, else you’re not going to want to load up too many intensive corrections – you will get a great result using Resolve.
If you want to go another way when crunching NR on 4K ProRes footage then you might want to consider Compressor’s built in Noise Reduction Video Effect. It only has 3 settings you can adjust which makes it easy to use.
Apple Compressor – Settings
Noise Removal: Reduces random flecks of noise in the video file, including noise introduced by codecs. This effect allows you to blur areas of low contrast while leaving high-contrast edges sharp, creating results that are imperceptible to the human eye but that improve the final compression of the transcoded file. The effect’s properties include:
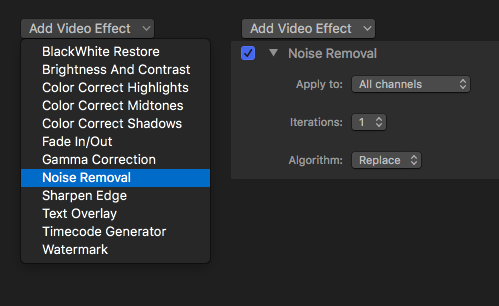
- Apply to: Use this pop-up menu to set the channels from which noise is filtered. Choose “All channels” to filter noise from all channels including the alpha channel. Choose “Chroma channels” to filter noise from the two chroma channels (U and V) in YUV.
- Iterations: Choose the number of noise-smoothing passes (between 1 and 4) from this pop-up menu. For instance, if you choose 2 passes, the noise-removal algorithm is applied to the media file twice. The file resulting from the of first pass is used for the second pass, and so on, so that the more times a pass is performed, the fuzzier the image becomes.
- Algorithm: Choose a noise-smoothing algorithm from this pop-up menu. Choose Average to modify each pixel’s color by taking an average of pixels around it, including its own color value. Choose Replace to modify each pixel’s color by taking an average of pixels around it, while ignoring its own color value. Choose Merge to modify each pixel’s color by taking a weighted average of surrounding pixels and itself (with the pixel’s own color value given greater weight).
ADD SHARPENING
While you’re in Compressor’s Video Effects panel, you may want to consider adding a touch of Sharpening to counter the inherent smoothing result from most forms of Noise Reduction. Here’s how to do that:

- Sharpen Edge: Sets the contrast around object edges. This effect can counteract the softening caused by noise removal or blurred source material and increase the perception of sharpness in the video. However, note that too much of this effect can make video look grainy. Drag the slider to set sharpening between 0.0 and 100.0.