Massive Documentary Editing Workflow in FCPX
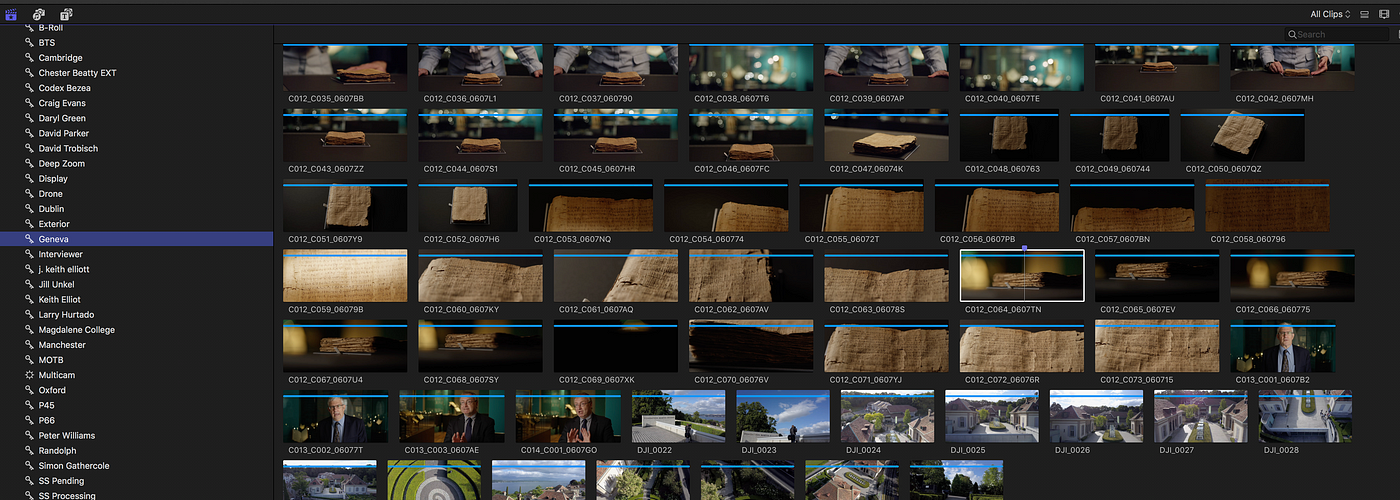
Final Cut Pro X treats footage as data instead of film. FCPX lets you take a massive amount of data and narrow it to the view you need when you need it. Narrowing the view of footage is absolutely crucial as projects balloon is size. The project Fragments of Truth has 923 clips comprising 68 hours of audio and video clips shot over a period of six months. Shot with 5 different cameras, in 5 countries, 15 interviewees, loads of technical terms used by the interviewees, with interview footage at 4K and B-roll at 8K all REDCODE RAW, it clocks in at over 8.12 TB of data including the temporary proxy footage.

How does one actually get started making sense of a project like this?
Marking footage in FCPX efficiently
- Create a new Library.
- In the inspector go to modify settings and select an external location for your media.
- Designate a fast local location for your Cache
- Create an event for Audio only clips named “- Audio”
- Create an event for Motion Graphics named “- Motion”
- Create an event for projects named “- Projects”
- Create an event for Stills named “- Stills”
- Mark all interview footage with the key word “A-Roll”
- Mark all b-roll footage with the key word “B-Roll”
- Ensure cameras are named consistently, if not select all the clips that pertain to that camera and in the inspector give them a name “A” “B” etc…
- Create a library level smart collection “Media is Video with Audio, Format Camera Name includes A”
- Repeat for each camera
- Create a library level smart collection for “A-Roll”
- Select all audio and video clips on each interviewee and press “Command + K” name them according to that interviewee.
- Select B-roll clips for a significant location and keyword them accordingly. Repeat for special items.
- Create a multicam clip from the interview clips and associated second source audio. (It is preferable to not cut the audio during the interview. Only do this if your audio recorder/Camera setup has redundancy for the recording.)
- In Final Cut Pro -> Preferences -> Playback turn off “Create optimized media for Multicam clips”
- Create a smart collection that displays only Multicam clips if you have to log multiple interviews.
- Select all your footage and create proxies. Go to bed.
- In the event browser select the clip
- Reject any initial sections of blank or set up time.
- Identify the end of the interviewer’s questions.
- Press “I” to set an in point
- Press “LL” to speed through the answer at double speed.
- Press “K” to stop on any great phrases, or topic changes.
- Press “J” to rewind back to the moment where the speaker begins to hit that point.
- Press “Option+M” to place and name a marker at that spot. Condense the name to the key info an editor would be looking for.
- Press “LL” to advance at double speed
- At the end of the interviewee’s answer press “O” to set an out point.
- Press “F” to set the range as a favorite. This should include the entire answer and exclude the interviewer’s question.
- Press “Shift + I” to move the playhead to the in-point of the selected favorite range.
- Press “Option + M” to set and name a marker. It is essential that the maker be within the favorite range.
- Press “Shift + O” to jump to the end of the selected range.
- Press “LL” to play double time over the interviewer’s next question. Make a mental note that the question should inform the answer, and therefore the marker names — but not always.
- At the end of the interviewer’s question press “I” to designate a new in-point.
- Repeat the steps as needed 🙂
- Once all interviews have been marked and favorited switch the browser view to “Favorites”
- Click in the browser, press “Command + A” to select all the clips
- Press the right arrow key on your keyboard to disclose all the markers and keywords.
- Use the search box in the event browser to search for a topic you tagged in multiple interviews.
- Use this same method to tag your b-roll. Favorite the good sections, place a marker within that favorite section that has the same terms as you used while tagging your A-roll
- To view all the A-roll and and all your B-roll at the same time click the “A-Roll” smart collection and “Command + click” the B-roll smart collection.
- Make sure your event browser is still set to “Favorites.”
- Enter a search term that you used when marking multiple interview sections, and B-roll sections.
- In the main timeline always insert a gap at the beginning “Option +W”, this will allow for opening music to be anchored to time instead of a clip.
- Select each interview section you want and press “E” to drop all the relevant interview sections on that topic into your timeline sequentially.
- Edit out irrelevant interview sections. Intercut as needed.
- Insert gaps to create breathing room.
- Drop in the favorited b-roll to cover jump cuts and gaps.
- Insert motion graphics and lower thirds using the controlled vocabulary as naming conventions.
Now you are able to see exactly where any topic is discussed throughout all your interviews, and all the usable b-roll that pertains to that subject.
Reuben Evans
Why these steps?Creating the Audio, Motion, Projects and Stills events allow for easier transfer of footage between desktop and mobile workflows when using proxy footage or conforming projects in Resolve.
Library Smart Collections?
Creating library level smart collections enable you to see all the clips of the same kind regardless of which event it is in. This allows for new events to be created when pickups are shot, instead of importing into the main event. This separation by time imported is really the best use of the event as an organizational tool. An event starts to max out on many computers by about 1000 items.
Why not create a favorite and just rename the favorite?
When you have marked a clip in the event browser and you use that section in the main timeline (project) that marker is searchable. Go to Index -> Tags -> and click the “Show standard markers” button. When working on a long project you can use this view to search for a place in your timeline, whether B-roll or A-Roll, if the section of the used clip in the timeline has the marker on it from the event browser you can search for it here.
Establishing a “Controlled Vocabulary”
This is extremely powerful if you have a timeline that is the full duration of a project. You are establishing a “controlled vocabulary” for describing your project. This makes it much easier to “transfer brain” between editors. It also makes thing easier when going back to an old project.
But when do I start editing?
This process places the majority of the work of editing into the browser. It forces the editor to organize, tag and review all the footage. The editor must resist the temptation to “get in there and start cutting.” The by product is that the editor will have a mastery over the content of each clip that will result in a mental index before the first clip goes into the timeline. By the time your clips are in the timeline you have cut the whole thing in your head.
Preserving and transferring the mental index
But that mental index has all been transferred into metadata in the form of markers, favorites, rejects, and smart collections. That means that the very valuable mental index is saved forever, and immediately transferable to assistant editors, or your future forgetful self.
Additionally, that metadata is exportable via XML and can be read by media asset management software. This allows for your footage to grow in value as it ages rather than diminishing in value.
Why not bins?
A traditional “Bin” or folder in an NLE allows the user to place a clip or sub clip into a single organizational spot. Markers, keywords and favorites allow for a portion of a clip to be viewed in many ways with footage that it is related to. Use a smart collection to say “Let me see all my favorited B-roll” or “Let me see all my favorited B-Roll and A-roll in London together.”
The edit
Once you have logged all the footage, and dropped it into the main timeline by topic, (I recommend separating each topic by a gap) it is time to craft your story. That is a post for another day. But suffice it to say, you simply move your building blocks around in a way that create intrigue, hills and valleys, foreshadowing and resolution. And then cut it in half.
Conclusion
Before you can make the most of that kind data you have to organize it. And make sense of it. And once an editor has made sense out of their footage it is all gravy from there on out 🙂
This article by Reuben Evans originally appeared on Medium here:
https://medium.com/@ReubenEvans/editing-a-massive-documentary-in-final-cut-pro-x-be305b445b96


